When writing your book you should separate the writing from the formatting. Write first, format later. However, there are some steps you can make when writing your book in Microsoft Word that will make the job of formatting your book easier and help prevent errors in the book formatting process.
Below are some of the most common issues I see in book documents sent to Jera Publishing to be formatted.
- Extra spaces or tabs used to create an indent for the first line of each paragraph
- Two or more paragraph breaks between paragraphs
- Two spaces between sentences instead of one
- Manual line breaks at the end of each line of text in a paragraph
- Two line breaks inserted at the end of a paragraph instead of a paragraph break
- Using tabs at the end of a paragraph to create a new paragraph
- Creating complex tables, charts, graphs at a page size larger than your book size
- Using only a paragraph break to create a scene break between paragraphs
- A series of paragraph breaks (created by hitting the enter key) to force text onto the next page
If you have a document already written in Word and it has some of these issues, don’t worry too much! There are many Find and Replace commands you can use in Word to correct them, which I detail below. If you are not sure which find/replace command to use to correct your issue, leave a comment describing your scenario and I will reply back with a Find and Replace for you to try.
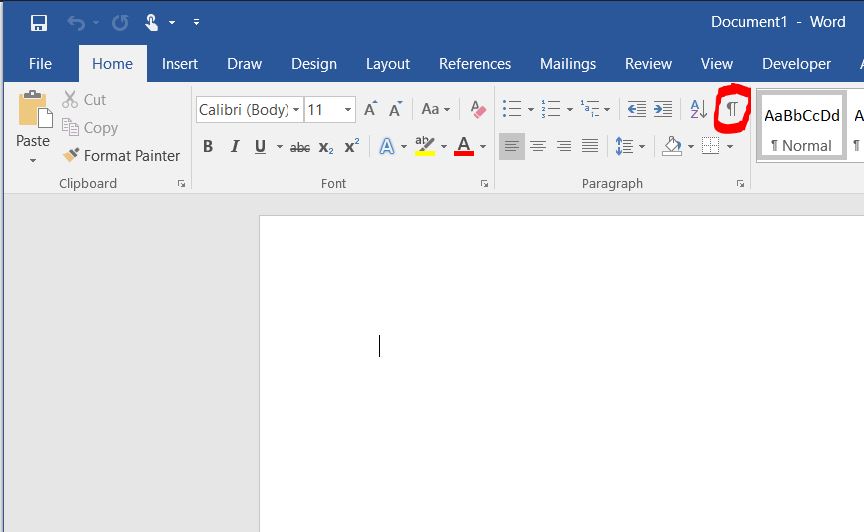
The first thing you will want to do is view the formatting markup by toggling on the Show / Hide icon in Microsoft Word. The location for this in Word 2016 is shown below. If you can’t find it, you can also press Ctrl + * as a shortcut. This will show you all of the formatting markup in your Word document.
1. First Line Paragraph Indentation:
You should not use extra spaces or tabs to indent the first line of each paragraph. When formatting, your book designer will use style settings to set the first line paragraph indent. If you used extra spaces or tabs to create a first line indent in your document, they will need to delete them from your document.
WRONG:
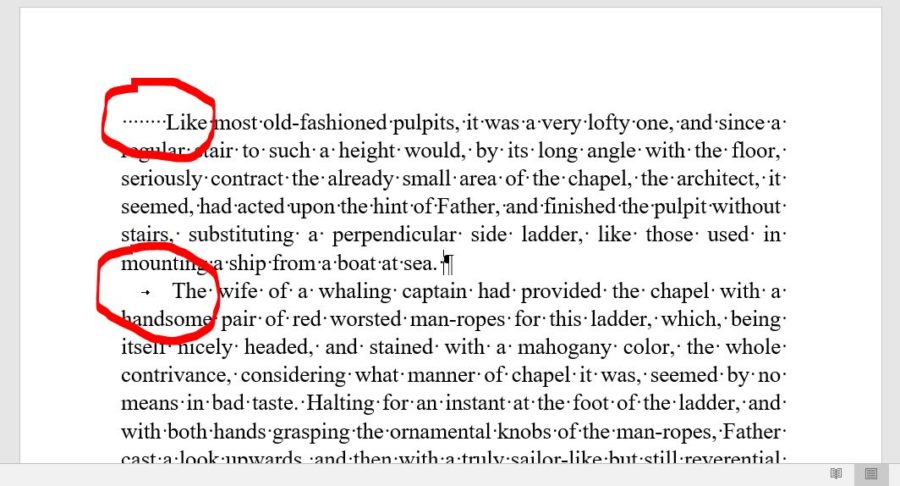
The reason many people do this is the default Normal style in Microsoft Word is set to not indent the first line of a paragraph. Authors mistakenly create an indent manually so they can distinguish paragraph breaks without realizing they should be modifying the style to do this automatically.
Instead of adding the indentation with spaces or tabs, you should be changing the style settings for the style you are using for the chapter text, if using Word’s defaults this would likely be the Normal style.
In Word 2016 right-click the Normal style in the Home / Styles ribbon. Click on Modify.
Click on the Format button at the bottom of the window that appears. Select Paragraph….
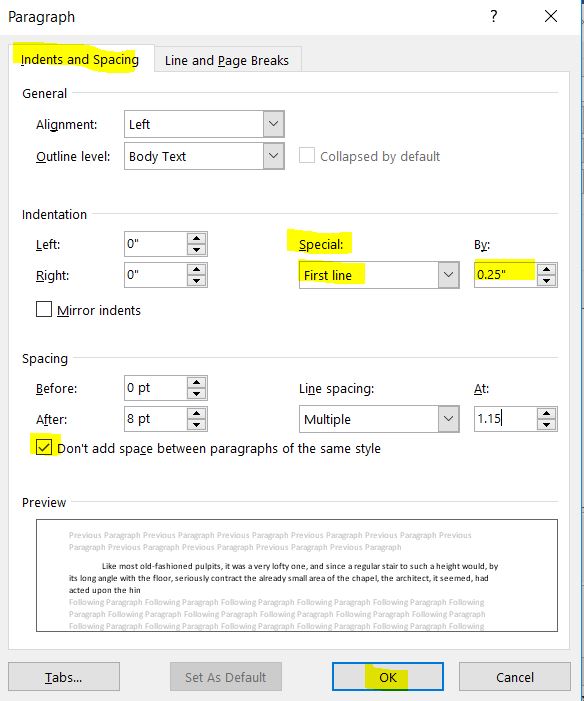
Under the Indents and Spacing tab, navigate to Special: First Line and enter 0.25. Then check Don’t add space between paragraphs of the same style.
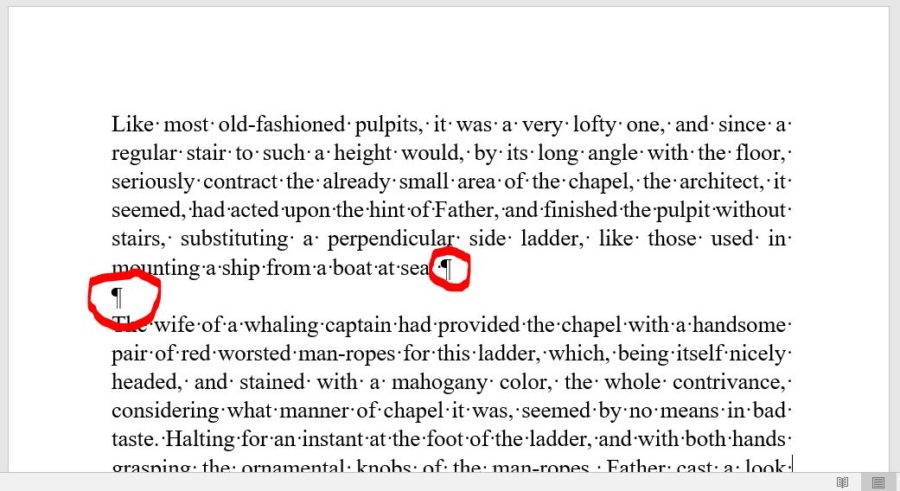
Now, when you type your text into Word using the Normal style and hit Enter to start a new paragraph, it will be indented automatically and no extra spaces or tabs should be used. When you send your document to your book designer they will not need to remove any tabs or spaces, which will speed up your job and reduce the possibility of errors (plus your designer will love you).
See also: Word Tips For Writers: First Line Indents Using Styles (video)
2. Extra Paragraph Breaks Between Paragraphs
Another common mistake authors make is adding two or more paragraph breaks between paragraphs (hitting Enter more than once at the end of a paragraph). Microsoft Word’s default Normal style in older versions of Word is set to not add space between paragraphs by default so authors learned to add them in manually with extra paragraph breaks instead of modifying the style settings.
WRONG:
Your book designer will need to remove all of these extra paragraph breaks in order to format your book properly.
A single paragraph break should always be used between paragraphs, not two or more. If you find it easier to write with extra space between paragraphs then you can change the style of Normal (or whatever style you are using for your chapter text) to add the space for you automatically. Using the directions above, uncheck the Don’t add space between paragraphs of the same style and make sure Auto is selected for space above and below.
Then, when you hit the Enter key to start a new paragraph using that style, Word will automatically add extra spacing between the paragraphs.
3. Inserting Two Spaces Between Sentences
When people were using manual typewriters, they were taught to hit the space bar twice between two sentences. However, with modern word processors (such as Microsoft Word) and fonts, only a single space should be inserted between sentences. If you place two between sentences, it will throw of justification and the book designer will need to remove the extra spaces.
To fix, use Find / Replace to replace each instance of two spaces with one.
See: Word Tips for Writers: Replace Two Spaces with One in our video library.
4. Inserting a Manual Line Break at the End of Each Line
This mistake is also commonly done by people who learned to type on a manual typewriter. You should not create a line break by hitting the Enter key at the end of each line of text; instead, let the text wrap naturally to the next line.
WRONG:
To fix this issue, I suggest doing a Find / Replace for a manual line break ( ^l ) and replace with a space. You would then want to follow up with a Find / Replace for two spaces with one.
5. Using Two Line Breaks at the End of Each Paragraph
Do not use a line break or multiple line breaks (pressing Ctrl + Enter) and the end of a paragraph. The proper method is to hit the Enter key once to create a paragraph break.
WRONG:
CORRECT:
To fix this issue, try doing a Find / Replace for two manual line breaks ( ^l^l ) and replace with a single paragraph break ( ^p ).
6. Using Tabs at the End of a Paragraph to Create a New Paragraph
When you reach the end of a paragraph, do not hit the tab key to move your cursor to the next line to start a new paragraph. Instead hit the Enter key once to start a new paragraph.
WRONG:
CORRECT:
Fix this issue by searching for a tab ( ^t ) and replacing with a paragraph break ( ^p ). Then search for two paragraph breaks ( ^p^p ) and replace with a single one ( ^p ). You will need to run the last search multiple times until Word says that no results are found. Keep in mind that this will remove ALL tabs in your document, so be careful!
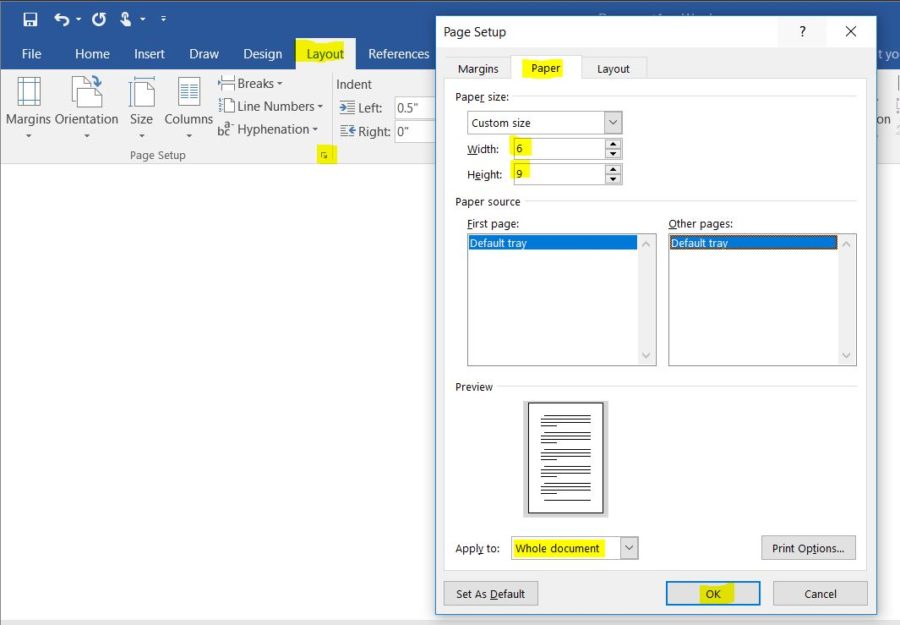
7. Creating Complex Tables, Charts, Graphs or Similar at a Page Size Larger Than What Your Book Will Be
Most likely, you will write your book in a typical 8 1/2 x 11 page size in Word. However, if you will be creating tables, charts, graphs, or other similar items you should consider setting your page size to the size you plan on printing your book. If you create your tables or other elements for an 8 1/2 x 11 page and your book is smaller, such as 5 x 8, they might need to be redone to fit the smaller size.
You can set your page size under the Page Setup window in Word.
8. Using an Extra Paragraph Break (Or More) to Create Extra Space for a Scene Break
It is common when writing to create a visual break when there is a scene change or time lapse in a book. Often this is done by simply inserting a few extra paragraph breaks before the new scene. The problem occurs when your book is sent to your book designer. One of the first things they will usually do is a find and replace to replace two paragraph breaks with a single one, as placing two paragraph breaks between paragraphs is a common mistake they correct for (see #2). If you only use paragraph breaks to create the scene breaks they can be lost in the formatting process.
I suggest inserting a few asterisks (***) between scene breaks, then instructing your designer on how you want them to appear visually. This way, they will not accidentally be lost and it will be clear to your designer where the scene break is located and they can format it accordingly.
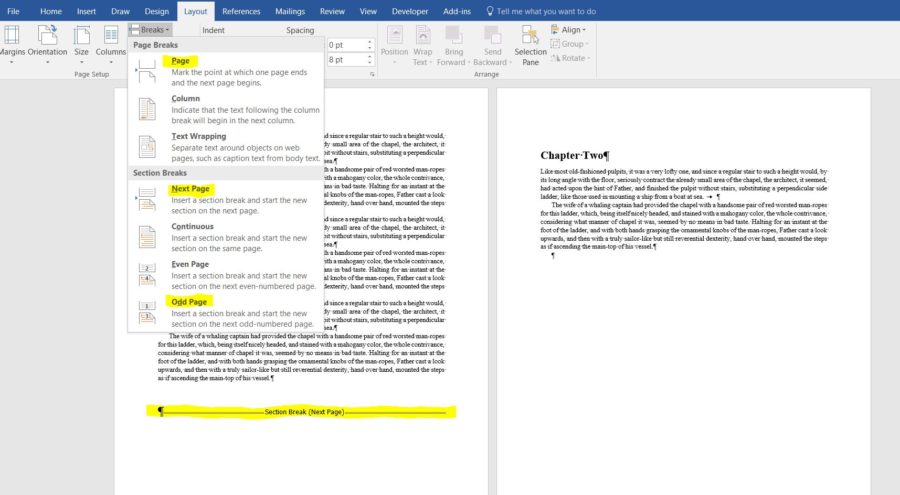
9. Using Paragraph Breaks to Create a Page Break
Do not use a series of paragraph breaks, created by hitting the Enter key, to force a page break.
WRONG:
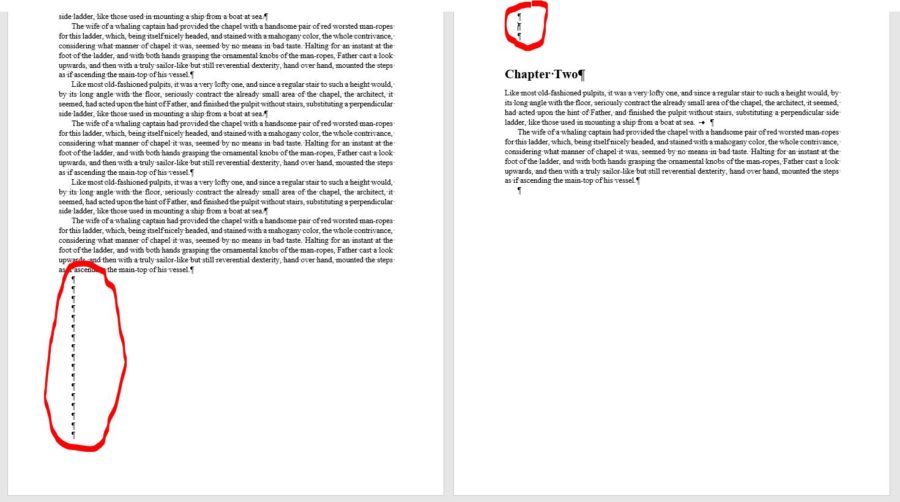
Instead, insert a hard page break (Insert > Page break) or a Section Break (Layout > Breaks > Next page or Odd page to start a new page. Also, only place a page break in places such as between chapters, after title pages, etc., not between pages within a chapter.
CORRECT:
I hope this helps! Please leave a comment if you have a question about fixing an issue in your Word document.
Be sure to check out our Word Tips for Writers videos for even more tips on working with Word when writing your book.
Kimberly,
I am writing a family history and have limited word knowledge. Do you have a service where I can send you my problem page and have you fix it? Such as flowing type around pictures? If this is something you do, please tell me how much and how I submit problems to you.
Dave Rauch
I know I’ve already broken rule number one. The rest I am not so sure about. I knew nothing about setting up the page to write, so I just wrote and kept on writing. I’ve written over 24,000 words so far, and I’m not exactly sure how to fix the indentation problem once. Plus, I’m not sure what other mistakes I’ve made. Any help would be appreciated. I’m using Microsoft Word 2000 if that helps.
I’m working with ISO (metric) paper sizes, and I have yet to find a way to specify type sizes using millimeters instead of Adobe points.
I wish that Microsoft, Adobe, et cetera would support the German DINS standard for digital typesetting that uses .25mm as a “Metric Point”. Please see https://www.cl.cam.ac.uk/~mgk25/metric-typo/.
Using one unit of measure for everything in the document would make life much easier, and avoid mistakes when converting between Imperial and ISO units of measure.
Hello,
I’m trying to complete my book in microsoft word and I’m having a few issues. I was wondering if you could help with the following and let me know how much you charge to provide your services?
I’ve justified the paragraphs so that it reads like a book and I’ve also made it so that hyphens are automatically added to keep the justification even. The problem that I’m running into is that in some places, the words are spaced too far apart. There is only one space between the words but visually it looks as if there are 2 or 3 spaces between words.
Is there any way you could please help us with this issue?
Thank you!
Good article. Only one of these errors do I commit, and I can’t see it as an error: I put two spaces after a period. Why? Not just because this is how I was taught 42 years ago when I learned to type. It’s because, in a monospace font like Courier, it makes it visually easier to quickly scan a document.
And why do I use a monospace font? Because it makes it a lot easier to do a quick estimate of word count when looking at a printed document. It’s part of standard manuscript format, which I always use unless the submission guidelines for a market specify otherwise.
Of course, my pen name is based on my favorite typewriter, so I may be biased.
I’m in the process of going through my manuscript to clean up the formatting. At the moment, I’m having trouble with the spacing between the top of the page and my chapter titles. As I was writing, I was just hitting enter the same amount of times, hoping for consistency. Now, I am trying instead to set line spacing before paragraph. Is there a standard for this? I attempted to do a 3″ space, but on some of my chapters it’s dropping down to well below 3″, so I must be doing something wrong. Any advice?
My question is about using Grammar & Style? I am using only Grammar which doesn’t seem to pick up possible errors. Should I use Grammar only? or both Grammar & Style?
Thanks
You suggest a single space between sentences, but when I set the formatting as you show in the Indents and Spacing section, it calls for 1.5 spaces between lines. Sorry I am a total novice, so what do you suggest, single or 1.5?
I think you’re confusing a couple different tools! When the author mentioned using a single space between sentences, they mean that you should avoid pressing the spacebar twice after a period. What you’re talking about, line spacing, is the amount of room between the horizontal lines of text. Truthfully, it doesn’t matter what line spacing you have. That can be changed with only one click, so it doesn’t matter to a book designer. Choose whichever option you prefer to read with!
Thank you for the information above. I am going to format my manuscript as described above.
2016 MS Word. The bottom of my pages are not even (one page may have 30 lines while the next has 31). I want them all to be even. In most cases it seems to occur when the following page is a new paragraph. I’ve worked through all these orphan/etc. boxes as to check or not check. Nothing fixes this problem that others seem to also have in MS Word. How can I fix this once and for all.
hi kim,
how about writing an essay on a blog,
should I apply those rules?
I want to insert a table having a complicated musical text which includes symbols with a varied number of rows and columns. I mean, each table varies in its content, row, and column sizesThe table should fit a book fold size 7.17″x10.12″ to make a booklet. I am unable to. I would be very thankful if you help me out to suggest specifications.
Kimberly, you are an angel! I am formatting another book for a friend, but this time I am stumped. He has several paragraphs throughput the manuscript in which there are paragraph breaks at the end of each line in the paragraph. How to fix??? He has also used tabs to indent first lines. When I clear all tabs, this leaves a hanging indent. Please help!! Thank you.
That is a tough one. It sounds like he may have converted a PDF into a Word document, which often leaves issues as you described. There is no easy solution, but for the paragraph breaks at the end of every line in some of the paragraphs, what I do is highlight the text in the paragraph except for the last line. Then do a find/replace for a paragraph break and replace with a single space. You have to do this for each paragraph, which is a pain, but its easier this way than removing the breaks manually one at a time.
For the hanging indent, I suggest selecting all text in the manuscript and go into paragraph settings and set all paragraphs to a normal paragraph setting. You may have to reset some of the paragraphs afterward, but this may be the easiest way to correct the issue.
Thanks so much for this, it’s very helpful. I’m really clueless with Word but I’ve written 6 books so far in Word ( 98, 2003 and 2008) and I’m getting ready to pub now. My first book was done in Word from late 90’s. In that one , in a few places in the manuscript, I have a heavy, bold dotted line ( square dots) at the bottom of a page, like the dotted line on a paper tear off. I don’t know what it is, how it got there or how to get it gone. No mater what I do it doesn’t go away. I tried selecting the page text without the line and pasting it onto another page and the dots still remain. Any help is appreciated.
It sounds like you have a border effect applied to that paragraph of text.
Try highlighting that paragraph then clicking off any borders that might be assigned to it.
Hello,
I see this thread is old but I am so hoping you can help me.
I have been using New Page section breaks in Word 2003 with odd and even pages. I wrote the entire book and tried to reformat it. I’m having problems with extra invisible blank pages that Word is putting in the document. I can’t get rid of them!
For example, when you open a book, you usually see the first page with the title on it on the right side of the book. You might then see a dedication, acknowledgments, etc. When I insert a “New Page” section break on the first page to try to force that first page (with the title and author name) to appear on the right side, Word is inputting an extra page between the first blank page (which I want to be there) and my second page (which I want to appear on the right). So there are 3 pages there instead of two.
I’ve looked everywhere trying to figure out how to force a page without having that extra blank page and can not find an answer to that. It throws off the whole odd and even pages at the top (sometimes there are two odd pages back to back, etc.). This is a nightmare.
Incidentally, I don’t have this problem where I actually start my first chapter. I use New Page section breaks (odd, even, first page, etc.) and there is no problem there. Only in the beginning of the book where I am trying to force text to appear on a certain page. Can you please offer some help?
By the way, I have tried deleting all the section breaks and resetting them and that too is a nightmare. As soon as I put them back, the problem appears.
One last question. I do have InDesign (not that great at it though). Should I try to paste the entire document in InDesign and format it there? Eventually, I’m trying to upload this to Createspace an also kindle e-pub. Any help would be so greatly appreciated. Thank you!
It is hard to tell what is going on without seeing the manuscript. Can you send it to me at km@jerapublishing.com to look at?
Very helpful – wish I would have found this at the front end of writing my book (first book.) Luckily have had some great editors catch these errors. Is there such a thing as a word preset (guess that’s styles) for a standard book format?
Hello,
I have a quest ion, my mother is 84 years old and she writes wonderful stories, I wish she would have them published but she has no idea how. But the question I have for you is this.
She has written probably 60 pages so far and all the sudden its not there, I know she has saved the documents but when she brings it up, its all in one continuous line. How can I fix that for her please.
Thank you kindly
Tricia
I am just writing my third book, my first two were 8 1/2 by 11 this is 6/9. anyhow, for some reason there are at least 25 extra blank pages which keeps adding an extra one every time I complete a new page.
I have just published one book with Amazon Direct, and I do not believe they will help me, it will just get published that way. I have tried to get help but to no avail.
Is there a good help program for WORD 10??
Thank you, Rebecca
Are the blank pages at the end of the book, or throughout the manuscript?
Hello, just found your post. Thank you so much… it was incredibly helpful.
Hi Kinberly,
I really enjoy your helpful blog and found many useful tips.
Can you tell me if I need a section break after every page in a book or just one section break at the end of the chapter to start the next chapter on the right (odd numbered page)? I felt I could use page break if a need arises otherwise.
Will numbering pages go well with out a page break after every page?
Thanks, Gail
You do not need to put a page break after every page, in fact, you should not. Let the text flow naturally from page to page. Section breaks are needed between chapters, but not a page break between pages.
Very helpful. I’m a semi-retired marketing/pr guy who is now moving into the “editor/copy” realm. I may print this out to give to clients when they ask why it is taking so long to copy edit their books. It’s because I have to fix and remove every one of these issues. 🙂 I do have a question for you though regarding formatting/writing: If the original manuscript is given to me in 8 1/2 x 11, and I know we’re going to do a trade pub at 6 x 9, shouldn’t I just go ahead and at least create the doc at 6 x 9? I’m going to have to make all these corrections anyway; I might as well do it in the doc size and make the styles as I go along. Your thoughts? Thanks in advance. Gary
Hi Kimberly, I’m being driven insane with section breaks and hope you can help. I’m attempting to put an odd page section break on the page prior to each chapter change to make sure the new chapter appears on an odd page. I have around 50 chapters to handle. I insert one of these breaks and all seems fine until I go through and check the complete layout of the book on Print Preview. Some of these breaks stay whilst many of them disappear and give me a regular ‘next page’ break, causing the page to appear on the left. I have now gone through the entire book three times and some of these breaks are still disappearing! I’m using Word 2007. Do you have a tip to prevent this happening before I pull all of my hair out? lol. Many thanks.
Can you send a copy of the Word doc to me at km@jerapublishing.com? I will need to take a look to see what is going on.
Kimberley… I’ve only just seen your response because my screen has been showing ‘awaiting moderation’ and I didn’t think to refresh it (Duh!) Thanks so much for your offer to look at the document but I have now sorted it (I hope!) It seems to work if I put the break at the beginning of the page I want to be an odd page rather than at the end of the previous page. So far, the Print Preview is showing the pages correctly. Should the problem recur, then I hope I can get back to you. Thanks again!
Wikipedia has an entry for Standard Manuscript Format. Should this format be used regardless of whether the document will be submitted to a publisher or self-published? There are some minor inconsistencies between what you say here and what SMF would seem to require. Examples are 0.25″ paragraph indentation vs. 0.50″, and flexibility to use something other than (ugly) monospaced typefaces. Would it be correct to say that adhering to SMF works for both publishing approaches, but if I am certain to self-publish, that there might be greater flexibility? I want to get it right, from the outset, to minimize downstream reformatting. Thanks.
Typically the format a publisher wants to see your manuscript in is very different than how a printed book looks. If you are self-publishing you should write the book in the font, font size, margins, etc., that you are most comfortable writing in while keeping in mind the tips mentioned in this article. Write first, format later. When it is time to format the book for print, it will need to be set to the right specs for printing. That will include the right trim size, margins, gutters, line spacing, fonts selected, font size, running heads, title page, copyright page, page numbers, etc. All of those can vary depending on the printer used, the genre of book, reading age, etc.
question do you insert a page break when going into backstory and out of backstory?
Do you mean a scene break? I would not suggest a page break, as that is more for a new chapter. A few blank spaces above and below the scene break would be more appropriate, perhaps with a small graphic or symbol of some kind, such as the following (but the symbol would be centered, which it won’t allow me to do in a comment):
Lorem ipsum dolor sit amet, consectetuer adipiscing elit. Aenean commodo ligula eget dolor. Aenean massa. Cum sociis natoque penatibus et magnis dis parturient montes, nascetur ridiculus mus. Donec quam felis, ultricies nec, pellentesque eu, pretium quis, sem. Nulla consequat massa quis enim. Donec pede justo, fringilla vel, aliquet nec, vulputate eget, arcu. In enim justo, rhoncus ut, imperdiet a, venenatis vitae, justo. Nullam dictum felis eu pede mollis pretium. Integer tincidunt. Cras dapibus. Vivamus elementum semper nisi. Aenean vulputate eleifend tellus. Aenean leo ligula, porttitor eu, consequat vitae, eleifend ac, enim.
~
Aliquam lorem ante, dapibus in, viverra quis, feugiat a, tellus. Phasellus viverra nulla ut metus varius laoreet. Quisque rutrum. Aenean imperdiet. Etiam ultricies nisi vel augue. Curabitur ullamcorper ultricies nisi. Nam eget dui. Etiam rhoncus. Maecenas tempus, tellus eget condimentum rhoncus, sem quam semper libero, sit amet adipiscing sem neque sed ipsum. Nam quam nunc, blandit vel, luctus pulvinar, hendrerit id, lorem. Maecenas nec odio et ante tincidunt tempus. Donec vitae sapien ut libero venenatis faucibus. Nullam quis ante. Etiam sit amet orci eget eros faucibus tincidunt. Duis leo. Sed fringilla mauris sit amet nibh. Donec sodales sagittis magna. Sed consequat, leo eget bibendum sodales, augue velit cursus nunc.
~
In enim justo, rhoncus ut, imperdiet a, venenatis vitae, justo. Nullam dictum felis eu pede mollis pretium. Integer tincidunt. Cras dapibus. Vivamus elementum semper nisi. Aenean vulputate eleifend tellus. Aenean leo ligula, porttitor eu, consequat vitae, eleifend ac, enim.
I don’t use a template with first line paragraph indentation when writing a rough draft, because I continually have to delete and undo tabs when re-working text. The problem I am running into is when creating a master document for my manuscript.
Your article taught me how to eliminate improper tabs and create that first line paragraph indentation, but it leaves me with a huge headache problem. Every single centered line is now misaligned, because the first line paragraph indentation has indented them in addition to them being centered. The only way I can figure out to fix this is to manually go through the document and use the back space button and re-center each and every line.
Needless to say, I am not eager to have to go through my manuscript and do this for every centered line–that would kind of defeat the purpose of fixing tabs all at once. Is there a way to do this without ruining the alignment of the centered lines? Or at least a way of fixing all the centered lines in the document at once?
I really don’t want to have to work with manually indented first lines when writing rough drafts, because it’s irksome to my process, but I also don’t want to have to change all centered lines when I create the full manuscript file. Is there a fix for me, or am I kind of damned if I do, damned if I don’t?
Thanks in advance for any advice you can share!
This is a little tricky! Ideally, a style would be created ahead of time for those centered lines and the style applied when needed instead of hitting the center button.
Since it has already been done that way, you should be able to do the following. First, create a style for centered text. Next, click within one of the lines with the centered text that also has the first line indent. Choose Select > Select Text With Similiar Formatting. It should highlight all centered text with a first line indent in the document that is styled the same. Then, click on the new style you created for centered lines to apply that style to all centered text.
Hope that helps!
This did indeed help, and solved the issue. THAT issue. Glancing through the rest of the advice here, I’ve gone about re-formatting my old novel, and ran into another problem. I hadn’t used page breaks, and had simply hit enter a bunch of times to begin a new chapter. Now, I can’t see a way of putting the chapter beginning 12 lines down on the page without hitting enter 12 times, but the page breaks make total sense. So now, after fixing the tabs issue and centering issue, I’m having to go back through, put a new page break in after each chapter, and re-format the chapter titles on the page. Wowzer! At least I know how to do it RIGHT the next time 🙂
Thanks again for all your help.
If you are using a style for your chapter titles (which you should be!), then you can set the Spacing: Before setting for that style to bring it down from the top of the page in the amount you desire.
While it makes sense to use a style for chapter title pages, I can’t seem to get it to work. I’m putting the requisite number of spaces, highlighting them and the chapter title, and creating the style. When I then go to use the style, it only puts one space in instead of the twelve I said to. What am I doing wrong there?
By the way, this is incredible help you’re giving out so kindly. Thank you again!
This is a little hard to explain without screenshots, so I made a quick blog post to show you, and everyone else with the same question, how this is done. You can read it here: https://www.self-pub.net/blog/setting-the-space-above-your-chapter-titles/
Is it better to not even write a manuscript in Word? It seems if I’m not careful, there would be alot of editing to do with format. Do you recommend another commonly available program to write a manuscript in that is format friendly for a book? Thank you.
Word is the best word processor to write your book in. For the layout, a professional book designer would take your Word document and format it in Adobe InDesign, but the book should not be written in InDesign, which is a page layout program.
Any word processor like Word will have the same issues shown in the article.
Blessings Kimberly. I am in the process of writing my first book, a book that has been in my head for oh about twenty years. The information you provide above is great and I think I actually understand it. I have difficulty in taking things in and understanding them when it comes to technical things. plus it doesn’t help that I’m dyslexic (which is probably why the actual writing of my 1st book has taken me two years so far). I am looking into self-publishing as been disabled I just can not afford to get it published but I’m hoping that self-publishing is a way for me. any more tips would be an absolute godsend.
Thank You.
Love & Light
Mandy
I have an incorrectly formatted manuscript. If I copy and paste it into a properly formatted blank (on word 2003) will it be able to reformat the document and cancel the old formatting? Or is there something else I have to do? (please don’t say I have to type it all again!) I have experimented with ‘auto format’ and it does weird things.
Hi Kimberley
I note this blog is years old but am about to write my book and want to format properly in advance. This advice looks fab. I am about to purchase Home and Student 365 will this do the trick and is all this advice still appropriate.
Best wishes
Margaret
Sorry just realised blog is bang up to date. Is 365 Home and Student appropriate to write a non fiction book which will include graphics. Thanks
Any version of Word is appropriate to write your book in. For formatting, do-it-yourself authors often use Microsoft Word but professional formatted would take the Word document of the manuscript and bring it into Adobe InDesign for the book layout.
I feel it is very important for me to thank you from my heart for the wonderful information you placed in this article, Kimberly. I have no problem writing a book but using the Word formatting terrifies me so I have never tried it in case I mess everything up. That you also used diagrams to show how things are done has been such a great help and given me confidence. I have now LEARNED more from you from one article about Word than I have in over 12 years of owning the programme. I cannot possibly tell you how excited I now am to have become more proficiant with my computer, and my manuscript now looks so exciting. I have also read the questions here from your readers and you have helped me further with your replies to them. A hundred thanks, Kimberly.
Thank you for your kind comments! Hearing that really made my day and has motivated me to do more articles.
This is extremely helpful in general, but I have a specific problem. I don’t know what I did, but I cannot get word to paginate my novel properly.
It all started when I didn’t want the tile page, the epigraph and Part One page to be numbered. I wanted to start paginating with first page of first chapter. Now I can’t get paginate properly at all. I go to numbering, click on top right for numbers, and it either overrides my header, or it prints the same number over and over again on the left inside.
I suspect I made some kind of formatting error and don’t know how to fix it. I hope you can help.
Ahh.. page numbering in Word. So much fun! (sarcasm) Okay, from what I understand, you are trying to get page numbers at the top, outside edges of your book, with page 1 starting at Chapter one.
First, you need to make sure you have a section break (odd) before Chapter 1.
Next, make sure you have headers and footers set to be Different Odd and Even and Different first page under Page Setup> Layout.
Then, you need to set the first page, even page, and odd page headers (and perhaps footers) to NOT be linked to the previous section.
Once that is done you need to go into your header area and create a center tab and a right aligned tab in Word. I suggest using the Heading style and setting the tabs there, then using the Headings style for your heading text.
Then you need to go into the even page header, make sure you are left aligned, then go to Insert > Page Number > Current Position > Plain Number. Click Tab on your keyboard, then enter what you want your header text to be for the even pages in your book (author name, book title, etc.).
Go to your odd page header, make sure you are left aligned, click Tab, enter the header text you want on the odd page headers in your book, click Tab, then go to Insert > Page Number > Current Position > Plain Number.
To make sure that the numbering is starting at page 1 in Chapter One, go to Insert > Page Number > Page Number Format and select Start at and enter 1.
PS. You should not place a page number in the header for the first page of the chapter. That header should not have anything in it. You can choose to place a page number on the bottom of that page, but nothing should be in the header.
Comment again with your results or if you ned further help.
My novel is actually my thesis, so I have to header on each page with my name, class info etc. I fiddled around yesterday, not quite sure what I did, think I put in a break, and then somehow managed to put page numbers at the bottom outside corner. Try as I might, I could not get Chapter One to start on page 1 (I got it to start on page 2), and could not put the page numbers in top right. They kept posting top right, over my header info.
I don’t get why pagination should be so difficult! I will follow your suggestions…as soon as I make sure I understand them. Thank you for doing this, the help is much appreciated.
hi Kim, I have my book in nice order but I made the mistake of using enter tab to create all kinds of spacing and pages. is there a find and replace program to correct this. thank you.
Doing a search for ^t and replacing with a space will remove all tabs in your book. But that may make a mess of everything if you used tabs to handle paragraph breaks and page breaks. If you send the manuscript to me I might come up with a way to correct it.
I HAVE WRITTEN THREE NOVELS WHICH WERE WRITTEN AND THEN TYPED WHICH WAS CUMBERSOME. THE BOOK I’M WRITING NOW I TYPE INTO MICROSOFT WORD IN THE COMPUTER. THE PROGRAM DRIVES ME CRAZY BECAUSE IT HASN’T GOT AN ORGANIZED METHOD OF SAVING THE MATERIAL AND RIGHT NOW I’VE LOST CHAPTER THREE WHICH HAPPENS TO BE THE LAST ONE I TYPED AND I FIND CHAPTER TWO AND CHAPTER ONE ARE IN TWICE AND THERE’S A CHAPTER I CAN’T RECOVER WHICH COULD BE ANYTHING. I WISH SOMEONE COULD GIVE A METHOD OF ORGANISING FILES AND LETTERS IN WORD. I HAVE NO TROUBLE WITH MY PUBLISHER WHEN THE MATERIAL IS SENT TO HIM IN AN ORGANIZED WAY, PREVIOUSLY I USED WORD PERFECT WHICH I DIDN’T HAVE TROUBLE WITH BUT IT’S OLD FASHIONED NOW AND EVERYONE WANTS MICROSOFT WORD. IF ANYONE HAS ANY TIPS ON KEEPING WORD TOGETHER IN AN ORGANIZED WAY I’D LIKE TO HEAR IT AND I’D LIKE TO KNOW HOW TO COPY ANYTHING OUT OF WORD TO THE E-MAIL. THE PUBLISHER I HAVE NO TROUBLE WITH HE DOESN’T GET THE NOVEL UNTIL IT’S FINISHED. IT DOESN’T MATTER WHO IS PUBLISHING I SET UP MY RULES AND THEY MAKE THEIRS, I HAVE HAD MORE THAN ONE PUBLISHER AND THEY ARE THE LEAST OF MY WORRIES. ANYONE KNOW HOW TO ORGANIZE THINGS IN WORD AND HOW TO E-MAIL IT OUT FROM WORD?? OF COURSE THE COPY FOR PUBLICATION HAS USUALLY TO BE SENT OUT AS HARD COPY.
R.GORDON HEPWORTH
THE MAKING OF A CHIEF
MEDICAL MAFIA
PRISMS OF THE MIND
This tutorial is very usefull..
If I have written a long document with tabs, do I manually have to remove each tab, or will the process described over ride them?
If you do a search for ^t and replace with just a space (just hit the shift bar in the replace box) it will remove all tabs and replace them with a space. You may then need to do a search for two spaces and replace with one, and also a search for a paragraph break ( ^p )followed by a space to remove paragraphs that start with a space.
Thanks for this helpful article. When writing a novel, the first sentence of the first paragraph in a new chapter or scene is not indented. I followed your instructions for indents but it automatically indents every paragraph and I can’t force that initial sentence back to the margin.
Also, you suggest checking the box “Don’t add space between paragraphs of the same style.” I can see it but it is light colored and am unable to check it.
I am using Word 2003. Thanks. Carole P.
I suggest creating a new style for the first paragraph of every chapter that does not have the first line indent setting. Then apply that style to each of the first paragraphs.
I am not certain about the “Don’t add space between paragraphs of the same style.” being grayed out.
Thanks Kimberly, I wish I’d found your blog long ago.
I have a question about First Line Paragraph Indentation.
Your instructions were very clear and easy to follow, and I’ve now made the necessary changes to my “Normal” style in Word 2007.
My problem is, I have three old short stories, (no 1st line para indents) and I would like to somehow apply the Indents automatically, without manually indenting each paragraph.
Is that possible?
Are those paragraphs in the older short stories set to the same style? If so, you can modify the style that they are set to and add the first line indent setting. If other areas of your document are set to that same style, then they will also get the indentation though. You may want to create a new style just for the paragraphs, then apply that style to the paragraphs.
I have read that the body of the text should be double spaced for a manuscript. Should quotes included within a text, that are taken from an outside source, be double spaced as well when submitting a book to a publisher? I am quoting from a public domain source and the info source of the quote is contained within the quote, as I am quoting verses from the Bible. In this case a footnote would not be needed in that the source is already shown within the text of what Bible version is being used. Thank you for your help.
If you are submitting to a publisher, then you will want to ask them how they want those set up before submitting the manuscript to them.
If you are sending the manuscript to a formatter, then you don’t need to worry about the spacing as the formatter will style those quotes properly for you.
Typically, if the quote is inline with a paragraph, then the quotes have the same spacing as the paragraph.
I really appreciate the time in writing this article. It was very informative!!
I have been unable to insert a hard page break at the end of a chapter. Right now I have “enter” down as many lines as I need. How do I get rid of these “enters” and insert a hard page break. Ideally, the page break would include how many lines down to start the new chapter.
I’ve tried Ctrl + enter which hasn’t worked. Also how can I get rid of a hard page break? I have one somehow in the wrong place. Thank you very much.
To make a new page on your document, after your text on the page, click on page layout tab at top, then click on breaks, insert a section break for the next page. This should cause you to make a new page. This is for 2007 version and may be slightly different in another version. You should be able to use delete key for getting rid of unwanted paragraph tabs or format Word as stated in article. Hope this helps.
I don’t know if you can help me or not. I don’t know if I can help me. We have a church constitution book already set up. However I need to add a small section to the front of the book. The page numbers are already on the book. When I try to add this section all of the pages go “crazy”. It is a letter size page, set up as landscape, with so that the book is 8.5 x 5.5 when folded. Is there a book style setting somewhere in Word?
Can you clarify what you mean by the pages going crazy? Are you using the book fold setting in Word?
Thanks for this valuable info!..I enjoyed reading!…Looks like I will need to become a MS Word wizard!..I have a basic question…As I sit to put my first words into MS Word( I plan to use the Dragon Software)…. What is your recommendation for separating Chapters??…I plan to have 8-10 in my non fiction ” how to” guide…Do I make each a separate MS Word doc file??…or keep them all in one file?
I suggest keeping everything in one Word document, unless you have tons of graphic files, then separate them so the individual document file size is not too large. Separate the chapters within the document with either a page break or a section break.
Thanks for your response!….I have limited graphics…but should I enter them in the flow of the writing?…or wait until done with the text!…and add during editing?
You should be fine adding them in while you do the writing. Make sure you are using high resolution graphics though, low resolution ones will not print well.
I am trying to format my manuscript. I used tabs for paragraph breaks. Please provide a step by step instruction for how to correct this. Sorry if it is already answered, I could not find it. Thank you so much for your help.
I suggest replacing all tabs ^t with paragraph breaks ^p. You will likely end up with a bunch of paragraph breaks between paragraphs after that, so then do a find replace for ^p^p (two paragraph breaks) and replace with ^p (one paragraph break). Repeat that find and replace until no more double paragraph breaks are found.
Many thanks for your help.
I have completed my story in word 2007 and now need to insert a page break between chapters in the entire document to submit to an agent.
Is there a simple way to do this other than manually doing each chapter – 63!
many thanks
There really is not a way to do this other than manually inserting a page break at the end of each chapter. The only way to do that would be if you set a style for the chapter titles, like Heading One. Then you can set the setting in the style to place a page break before that style. However, they agent may not accept the manuscript with the page breaks done that way, they probably really want an actual page break or section break between chapters. To do that, place your cursor at the end of each of the chapters and press Ctrl + Enter.
Hi
I am writing fiction and found the above advise helpful. My problem is to have exactly 25 lines per page and approx 250 words per page. How can I achieve this using Times New Roman font of 12.
I tried using the paragraph Tab, Indents and Spacing and Set Line Spacing at Exactly 24 pts. But sometimes the number of lines goes over 25.
thanks
It is very difficult to get the number of lines to be exactly the same on each page using Word. It is just not meant for page layout, just word processing. This is one reason professional book designers use InDesign instead of Word.
Regardless, one reason the lines may be coming out uneven is due to Widow and Orphan control in Word. That makes it so there is never a single line of a paragraph either at the end, or the top, of a page in Word. So if that would happen, Word pushes lines from one page to the next. You do WANT that turned on, having widows or orphans is a worse offense than not having the same number of lines on a page.
The only way to correct would be to adjust some of the paragraphs on a page to either end a line earlier, or extend out another line. This is tedious work! Most authors/designers do not bother doing this. Even in InDesign this happens and manually needs to be corrected (but is easier to do so). If you pick up a book off the shelf, you will see that many do not have even lines on all pages either.
My advice it to not worry about the number of lines being the same on each page, that will just drive you crazy.
Thank you for the great advice. I only wanted to know about paragraphs in a new chapter. I’d changed all mine to be flush left then when I re-opened the document I got concerned I’d made a mistake. However, I did learn some valuable ways of correcting older documents. Thanks again
It is common practice to remove the first line indent of the first paragraph of chapters. No mistake made!
Hello, uh, I’d just like to ask about something. Do I need official Microsoft Office Word if I want to publish a book? Just to make sure and avoid some serious problems.
There are many text processors out there that are competitors with MS Word, some of which are open to almost anyone to use for free. Basically, as long as you use a standard doctype, such as .doc, .docx, .odt, .odf, .rtf, then they should have little to no issue opening and publishing your book.
Good luck on your book.
Thank you so much for this article. I am in the process of writing a book and with it being my 1st one, I’m completely clueless. The only things I know and remember are from high school. Your experience and knowledge is definitely appreciated
I am trying to format my fiction book in MS Word 2013 using left alignment. For no reason apparent to me, there will be a sequence of lines of type at random locations on a random page which DO NOT align left but align where the paragraph indent is located. Thank you very much for any help in resolving this if possible.
Bob
Bob, I would need to see the document in order to figure out what is happening there. Feel free to send it to me at km@jerapublishing to sort it out.
I am publishing a book and have created my manuscript using Word 2003 (it’s been an ongoing project for years).
I have ‘End Notes’ at the end of my book.
The Publisher requires that the very last page of the book be BLANK.
However, Word will not allow me to add a new Section Break after the end of the End Notes section (which would otherwise allow me to remove the page number and the footer that appears on that final page that is suppose to remain blank).
Can you help?
Ah! A tricky (and good) question, but I know the answer.
First, change your Note Options to Endnotes: End of Section. Do this by right clicking on and endnote an choosing Note Options.
This will make all endnotes appear at the end of each section instead of at the end of the book.
Next, Go to each of your sections (or highlight to select all of them) and go into Page Setup options.
Under PLayout/em> check the box that says Suppress Endnotes. This tells Word to not show the endnotes in this section, but to put them in the next section. Do that for all sections except for one at the end that you can create for the endnotes.
You can now add a new section and blank page at the end of the book after the endnote section.
Hello, love the article. Maybe I could add a few more.
Spaces before punctuation, left aligned text with manual hyphenation, tables inside text boxes, images inside text boxes, double commas or apostrophes instead of double quotes.
Open parenthesis and double quotes not closed anywhere, manually added footnotes, randomly added page breaks, each with different page layout settings. Manually added pagination that gets messed up several times through the book.
I get really irritated when I find books messed up like that, but then I take a look at the person, and I see they’ve poured their soul into that thing and no matter how difficult I still try to get it right in a way they like it and also looks good. (clients get really, really strange about some things)
PS English is not my first language, or second, which does really strange things to my grammar and vocabulary.
PPS My personal horror, very low quality pictures either low res or “enhanced”.
Just a Huge thank you; this was, in a few simple paragraphs, exactly what I was looking for. I wanted to let you know this, And that I was Able to Understand it, lol.
I’m using Windows 7. My recently completed manuscript for a novel contains two spaces between sentences. I’ve tried multiple find/replace searches and have had no luck trying to go to one space. Please advise me. Thank you.
One thing you can do is go to File > Options > Proofing > “When correcting spelling and grammar in Word” and do two things:
+ Select Grammar and Style in the Writing Style dropdown
+ Click Settings… and under the require section will be a question how many spaces you’d like after each sentence; you can select, 1, 2, or “don’t check”. Select 1.
Then Recheck Document to run the spelling and grammar check.
I want to know about the main heading as well as sub heading treatment while writing a book in ms word. What is exactly paragraph brake
Setting Heading levels in your document would be very helpful to your formatter. The first level heading should be set to the style of Heading 1, the next level, Heading 2, and so on. Some set the Chapter titles to Heading 1, then Heading 2 for the first level of a subheading. These styles are default styles in Word. You can modify the way they look by right clicking on the Style in the Word Style ribbon and choosing Modify.
A paragraph break is where the paragraph in your manuscript ends, and the next one begins. These are done in Word by hitting the Enter key. The formatting mark for them looks like: ¶.
Dear Kimberly,
I am in the process of editing a novel of over 600 pages. I have been reading advice on not having too many italics in a book being used in the first person, as character thought processes, when the main body of the book is written in the third person. These italics usually follow the dialogue, but are mainly not included within the dialogues inverted commas. These italics are either at the beginning or at the end of a dialogue stream. Do you have any advice as to reducing the italics, but not to the disadvantage of the dialogue prose. I feel I have got into the habit of using too much italics in the thought processes of my characters. Are these insertions normal in a novel or do they make it harder to read?
Thank you so much!
I would like to know how to set dialogue within a paragraph in a novel. Some of my dialogue is in speech form and some in italic thought form, when the person is thinking to themself. If you have dialogue within a long discriptive paragraph, do you place the dialogue on a new line as an indented paragraph in its own right? If you have italic thought dialogue in a long discriptive paragraph, do you also place that on a new line as an indented paragraph in its own right? At the moment I have long paragraphs, which seem a little hard to read because of speech and thought dialogue buried in a long paragraph? I know when diologue is spoken between two people, it is set down as dialogue each in its own line. But sometimes it does not work out like that… Somebody suggested to buy an already published novel by a successful author and learn from that…every author seems to have their own preferences though. What do you suggest. John.
Hi Kimberly. I know this is a self publish site, but I have a question about the scene break. And you are by far the most helpful site I have seen. I plan to send my manuscript to an agent, but I wanted to know if in the scene break should I still add the *** to indicate a change or allow them to inform me if it is needed? It is so mind boggling. Some say don’t add, and some say do add them. I’m a little lost, I appreciate any feedback. Thank you for help.
If you are sending it to an agent, you should ask them what they prefer. Each agent may be different in how they want the manuscripts formatted for submission. If you can not get an answer from them, I would suggest leaving in the *** to indicate a scene break. That is how we always requests document sent to us for formatting.
Kimberly Martin
Jera Publishing
km@jerapublishing.com
Thanks for info. Have formatted my doc with para indent.
With this in mind is there anyway to have the first line of each chapter without this indent which I believe is the normal case
thanks
Paul,
The best practice would be to create a new style for the first paragraph that has the first line indent setting set to None (or 0) and then apply this style to each of the first chapter paragraphs.
Kimberly Martin
Jera Publishing
km@jerapublishing.com
Hi Kim. I too am from the old school and double space between words. It’s a habit I find difficult to break. I have Word starter on my puter. My problem is when I cut and paste a chapter of my novel into Microsoft One Drive which is a cloud service or into an e-mail when an agent asks for the first chapteer the formatting gets all screwed up, ie: the chapter numbers and names are not longer centered on the page. I’ve even seen where the type face/size changes. This is quite annoying since I then have to go in and fix the formatting. Any suggestions? Thanks
Michael,
When pasting from one Word document into another, you should be given some paste options. One of them is “Keep Original Formatting.” The others will wipe out the formatting that was applied to the text you are pasting. See: https://support.office.com/en-us/article/Control-the-formatting-when-you-paste-text-20156A41-520E-48A6-8680-FB9CE15BF3D6#bm1
Kimberly Martin
Jera Publishing
Well if anything of what you posted here would actually work, would be be awesome. I have been at it for hours on the first page now. Trying to start my book, using word 2007. Followed the instructions to start, with the indenting and no space between same paragraphs. Does nothing but mess up everything on the page when applied.
Been all over the net, and cant find anything anywhere that actually helps someone start typing a book, without all this setting up nonsense etc. I had better luck using wordpad to type out shorter stories, or poems.
Frustrated doesnt even cut how mad I actually am.
Unfortunately, if you want to have a properly formatted book, you need to do some initial setup and learn how to use styles and section breaks, etc. You may find is easier to start with a template. See: http://www.bookdesignwizard.com.
Kimberly Martin
Jera Publishing
Hello Kimberly Martin,
I stumbled upon your site and found it quite interesting. I am a scientist and am about to start writing a book. It is a daunting task for me, as I have written many internal progess reports over the past two decades, but anything beyond that dates way back to graduate school (no, I’m not going to date myself!). I want to write it the right way from the get-go, and was wondering if you could point me towards a resource that goes over all the important physical and organizational aspects of writing nonfiction in Word.
I’m not even sure how to get started. Is it best to subdivide the document into separate chapters, stored as separate files, to be merged later, or keep it all in one document?
Thank you,
Jay
To answer your question about storing chapters in seperate files, if that works best for you, you can do that. However, before you send your files off to a formatter, it would be best to have everything together in one file so they know what order to put them all in.
Thanks Kimberley, although the mss has been edited and checked carefully for that sort of thing by a professional editor. Indeed the POD paperback version is fine. I wondered if there is an easy way to fix it with the ebook?
Hi Kimberley Martin, thanks very much for a great post. Point 8 happened to me. The gaps to signify scene changes had been closed up in the formatting process. So I did what you said with the asterisks and my publisher has now done it. However, the paragraph indentations are now all awry. Some are much fruther in than others. They are very erratic. Any suggestions why this might have happened?
Thanks,
Andy
You may have extra spaces in front of some paragraphs or tabs, but not others. If a style is used to indent the first line of a paragraph, and some of the paragraphs also have spaces or tabs in front of them, some will end up indented more than the others as the style indentation PLUS the spaces or tabs will be used.
Thank you! I was really frustrated with 365’s layout and couldn’t find the paragraph options. You helped me to get my fiction manuscript in perfect shape for submission to agents. I’m so relieved!
Some very helpful comments. In general I follow them. The idea that I will find hardest though is the lack of two spaces between sentences. This, as maybe you can see from my message, has been engrained in me. In fact if I look at a book that has only one space between sentences I find it very off-putting. This will take some getting used to!
What is the space between the chapter number and the first paragraph of the chapter typically?
There is not a typical amount of spacing. You do not want the text to start more than about 1/4 or 1/2 of the way down the page however. If your book is a smaller size, say 5 x 8 versus 6 x 9, start the text up a little higher on the page or it may look a little odd.
I have found your article and replies to comments enlightening and most useful in the preparation of legal documents. Thank you. I have been using the format painter in conjunction with Find and Replace to make corrections. Is that a good or bad idea?
You’ve now made me want to write a book. 🙂
Reply from a previous comment.
I was planning on submitting the manuscript for consideration to an agent when finished. However, I do not wish to have my manuscript denied due to improper formatting, and I lack the understanding to submit my manuscript to Amazon when finished.
This is beginning to concern me due to the fact I have found a way to indent on Google Docs, but when I attempt to indent a paragraph with one of the options, to me it appears unprofessional, sloppy, and perhaps causes a strain to read. I found a second app, Polaris Office 5, has the same paragraph indentation options, but with a variety of ways to customize the documents.
Maybe I am stressing things too much and should focus on completing the manuscript. I can’t help but stress this though, as I wish to know what to do ahead of time instead of scrambling around in a mad hurry to polish it off perfectly before submission.
Do you think it is better leaving the paragraphs unindented with an explaination in the query letter, or to indent and submit what I believe, appears “funky”?
If you are submitting to an agent they most likely have their own specific requirements, and you will want to follow them before submitting so your manuscript is not rejected automatically. You need to do some research to see how the agent wants manuscripts formatted for submission. You may want to get a copy of Microsoft Word as they will probably want the manuscript submitted as a Word document.
Hello.
I am currently in the midst of a predicament with a YA manuscript I am working on.
I am using google docs app for android and was previously under the impression that I needed to manually indent each paragraph with the space key and break paragraphs with the enter key. I know this is more for users of Microsoft word, but I was hoping you could point me in the right direction. Any help is welcome. My current device is a Samsung Galaxy S5. It is literally all I have to work with.
You can email me directly at yelton72@gmail.com for the quickest way for a response.
Sincerly,
Michael.
I am not familiar with the Google Docs app for Android. Are you only writing the book this way or do you intend to use this for the final formatting of your manuscript as well? If you will be sending it to someone else to format, or using a different program to format after you are done writing the book, then don’t worry about that for now and just correct any issues in formatting.
My apologies. I just noticed the ‘Reply’ option here.
Spacing is as much up the the artistry of the author as the words themselves. Same goes for ‘incorrect’ grammar used intentionally.
I wrote 300 pages and used the tab button on my keyboard…
Now when I try to publish it, it’s looking for the rule in first line tab.
I highlighted everything, went to tab and cleared out all of the tabs; however, that only removes it cosmetically.
My manual pushing of the tab button is still there, so when I go to upload my book, the tab is taken into consideration (twice, now that I set the rule via First Line Tab).
I tried copy and paste with no formatting, but I can’t get rid of the tabs.
How can I delete each tab stroke I hit?? Please help. 300 pages stinks.
If I understand it correctly, you did not actually remove the tab, but reduced the tab indent to zero. To remove the tabs using Find/Replace you would enter ^t into Find and leave the Replace empty. That would remove all of the tabs in the document.
Keep in mind that that will remove all tabs in the document, not just the ones you used ot indent the first line of paragraphs.
Kimberly Martin
self-publishing coach
Jera Publishing
What is the up karat to look for paragraphs indented with Tab key? I think I tried Shift/T and it did not work. I have about 300 pages to do.
To look for tabs search for ^t.
To look for paragraphs that begin with a tab, I suggest searching for ^p^t which will search for a paragraph break followed by a tab.
Hope that helps!
the up caret, in case you did not figure it out, is SHIFT 6.
So, I guess it’s called a manual line break in my case–the writer pressed enter twice for new paragraphs, to create a space between each paragraph. I’m not sure what to enter for Find/Replace to fix that (to get rid of the extra, unnecessary space between the paragraphs).
Thanks. Your article has been bookmarked. 🙂
You should be able to do a search for two paragraph breaks and replace with one.
In Find, enter ^p^p and in Replace enter ^p.
Kimberly Martin
self-publishing coach
Jera Publishing
Hi Kimberly,
Thanks for sharing this great information. I had the same problem as the previous comment and, using your advice, removed the extra spacing.
Now is there a way to apply styles after doing this so that each new paragraph is automatically indented as per the selected style?
Jeremiah, first, do you have all chapter text paragraphs set to the same style? That would be the first step. If they are, then you can set the First Line Indent setting in the paragraph style to automatically indent the paragraph’s first lines.
Find the style name under Styles that the chapter text is set to, then click on Modify. Click on the Format… button at the bottom then choose Paragraph. Under Special select First line and set the amount of indentation you want under By. Setting it to .25″ is usually the best choice. If you have a large book size (8.5 x 11 for example) then a larger first line indent can be used.
If the chapter text is set to different styles, it is a lot harder. You can select all of the paragraphs and then manually set the first line indent setting, but setting all of the chapter text to a style would be a better option.
What’s the rule when you change point of view between paragraphs? You know, when you see multiple spaces between two paragraphs within the same chapter? Do you manually enter those spaces?
That is called a scene break. It is also used when there is a change in scenery (location) or a jump in time. There are a few methods you can use. One method is to use a blank space as you mentioned, another is to have a symbol of some sort centered in the line between the two paragraphs, such as:
After dinner, the two parted ways and headed home.
***
Two weeks later, Gregor woke from troubled dreams and he found himself transformed in his bed into a horrible vermin.
If you are sending your book to a designer they may request (we do) that you place three asterisks (***) between the scene breaks. This helps them easily find the scene breaks and apply the proper styling, which may be just a blank space or a symbol depending on your preference. If you send your manuscript to a designer with scene breaks that are not marked in some way other than an extra paragraph break, they could easily get overlooked and accidentally dropped from the final format.
However, if you are using the blank space method and designing the book yourself, you should not simply hit enter twice or more to insert that blank space. You should instead use Word’s “Space After” style setting and apply that style to the paragraph before a scene break. That will place extra space following that paragraph without having an extra paragraph mark floating around just waiting to cause issues.
Personally, I prefer a symbol of some sort to indicate a scene break. It causes less issues when formatting your book and makes it clear to your reader that there is a change in POV, scene, or time. If using a blank space and the scene break falls at the bottom or top of a page, there is no longer a clear indicator of the scene break as it will not be very noticeable where a symbol will be.
Kimberly Martin
self-publishing coach
Jera Publishing
I’m calling bs in this entire thing. Not all of us have Microsoft word.Not all of us are writing a book to be serious, maybe we’re doing it for the hell of it. And maybe we don’t have published so we have to press tab and enter and those line breaks are also called periods which are pretty necessary
If you are not using Microsoft Word then this article does not apply to you as it is an article about mistakes made when using Microsoft Word. You do not have to use tab to indent the first line of your paragraphs, the article explains a better method using styles that works regardless if you are publishing or not. Line breaks are not periods, which are necessary. Line breaks are when you press Shift + Enter to break to a new paragraph (wrong and unnecessary) instead of just Enter (correct and necessary). Line breaks do not create a true paragraph break which can cause issues.
Kimberly Martin
self-publishing coach
Jera Publishing
I seem to have used the wrong box to convey my utmost surprise and thanks. I am doubtless one of many who have used indentation manually for paragraphs,, breaks and change of scene. Hundreds of them. In order to correct these mistakes , do I have to undo all that effort before I follow your
guide? I noticed the 05 Normal – I did in fact indent 5 spaces each time. What
a waste of effort.
With many thanks, BB Shane
You can use Word’s Find and Replace to search for two spaces and replace with one, and repeat until it returns a 0 found message. Then do a find and replace for a paragraph break followed by a space and replace with just a paragraph break. That will remove the last space in front of all of the paragraphs.
I recommend saving a backup copy of your document before you do this as it may have unintentional results.
Do not fret too much over using spaces to indent your paragraphs if sending it off to a formatter. Most formatters should be very use to getting documents like this and be able to clean them up quickly. Most of the documents we receive from clients are done that way and we fix them as part of our normal formatting process.