by Kimberly Martin | Feb 21, 2018 | Author Toolbox Blog Hop, Self-Publishing |
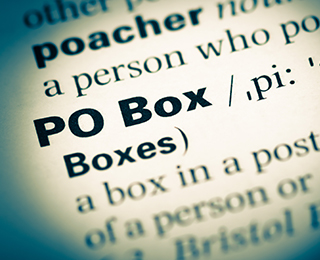
One of the first steps you need to do when you decide to publish a book is to go out and get yourself a PO Box. Why? One word: Security. Without a PO Box, you will be using your home address in places that it is easy for anyone to find. Do you want your readers to know exactly where you live? Would you want your Annie Wilkes to know where to find you? Probably not. (more…)

by Kimberly Martin | Jan 16, 2018 | Author Toolbox Blog Hop, Self-Publishing |
If you are self-publishing a book, you need to understand wholesale discounts and how it affects the amount of money you will make when you sell a book through retail channels. When I talk to authors about how to calculate their book’s profit they’re often a little lost when it comes to understanding wholesale discounts. In this self-publishing article, I will explain what a wholesale discount is, and how to calculate the amount of money you will make when you sell your book. (more…)
by Kimberly Martin | Oct 16, 2017 | Author Toolbox Blog Hop, Self-Publishing |
Many self-publishing authors form a business (publishing company) with its own name and publish their book under the publishing company’s name instead of their own. Here are five reasons that you may want to do this, and two reasons you may not want to:
- You do not want readers to know that you are self-published. Creating a publishing company with its own name and listing them as the publisher of the book makes it appear that your book was picked up by a publisher, and not self-published.
- You are publishing multiple books and want to create a “brand” and the publishing company is part of that branding. This is a perfectly valid reason to create a publishing company name and more often this is the reason I hear from authors as to why they want to use a publishing company name.
- You are publishing a book that is part of a larger business. For example, let’s say you are a business coach and you have an existing business named ABC Business Coaching. If you decide to do a business coaching book that is part of that business, you can use ABC Business Coaching as the publishing company name instead of your own.
- You are using a pen name. If you are using a pen name, you may not want to use your real name as the publisher to help keep your identity hidden. You can’t use the pen name as the publisher since that is not your legal name. You would need to go through the same steps as someone forming a Doing Business As to use a name that is not your legal name as the publisher.
- You want the extra protection of a Limited Liability Company (LLC). If you publish under your own name and someone sues you for something related to your book, they can come after your personal assets. If you publish under an LLC (and do it correctly), they can only come after the LLC’s assets, not your personal ones. Keep in mind that it is the extra step of creating the LLC, and not just using a publishing company name under a DBA that grants this protection. Many authors that are doing nonfiction books choose to do form an LLC. There are other forms of business that will also grant this protection, but the LLC is the easiest of them to form.
There are only two reasons (in my opinion) why an author might decide not to create a publishing company to publish their book under. And they are big reasons!
- Paperwork
- Money
To use a business name to publish under you must file a Doing Business As (DBA)* or form a Limited Liability Company (LLC). While there are other types of business structures, those are the two most common types for authors. Each of these means filling out forms and paying fees to your local government. A DBA is typically done at the county level and an LLC at the state level. The costs involve vary depending on where you live but can run into the hundreds of dollars. A DBA is not too difficult to set up, while an LLC is more complex and you might need to get someone to help you do it correctly, which will cost even more.
And these are not one-time costs. An LLC will need to pay an annual fee, while a DBA often stays in effect for numerous years, but does expire after some time (depending on where you registered).
So, is it necessary to create your own publishing company just to hide the fact that you self-published? Does anyone really care? No, not anymore. Self-publishing had a stigma in the past and authors were better off hiding that they self-published, but not so much now. Many authors are now embracing the fact that they are independent and self-published and proudly proclaim it to the world.
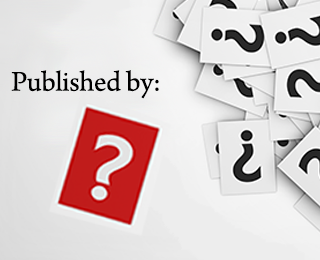
If you don’t want the hassle or are on a budget, you absolutely do not need to form a business to create that publishing company. Instead, just publish under your own legal name. That means that when you buy your ISBNs (if you are), you would put your own name down instead of a publishing company name. On the copyright page in your book, you do not need to put any “Published by” statement there at all. Just leave that off. There is no requirement for a publisher’s name to be included.
What is right for you? Well, that is for you to decide. There really isn’t a wrong or right answer here; think about your goals as an author and your budget, then make a choice. You should have this settled before you purchase any ISBNs or set up your accounts at IngramSpark, CreateSpace, or Amazon’s KDP platform, however. If you create a publishing company, you should be buying the ISBNs and setting up the accounts under its name.
* Some areas call a Doing Business As (DBA) a Trade Name or a Fictitious Name.
Do you want to learn more about how to create your own publishing company? Read my other post: Self-Publishing Short: Creating Your Own Publishing Company.
by Kimberly Martin | Sep 19, 2017 | Author Toolbox Blog Hop, Book Design, Word Tips for Writers |
What is a Section Break?
In Microsoft Word, section breaks are meant to divide your book into sections. In books, they are used between chapters and to divide the front-matter or back-matter pages. Section break should be placed after the title page, copyright page, dedication page, table of contents, chapter 1, chapter 2, and so on. These section breaks will create a page break between each of those sections.
But it is not just a page break. Section breaks also control the page numbers within the section, running heads, and whether the next section begins on the next page or next right hand (odd numbered) page. Let’s look at each of those.
Page Numbering
Section breaks allow you to control the numbering in each section. This lets you have page #1 be the first page of Chapter One. It also makes it possible to use lower case roman numerals for page numbers (i, ii, iii, iv, etc.) on the front-matter, and Arabic numerals (1, 2, 3, 4, etc.) on the chapter pages.
Running Heads
Each section has a first page, even page, and odd page header. You can place different running head text in each one (or not have any). In a book, the first-page header should be left blank as this would be the chapter title page, the even page header often has the book title, and the odd page header the current chapter title or author name. when you use section breaks, you can have different running heads in each section. This is useful for having the current chapter title for the running head of a section. You can also choose to link the current sections running head with the previous section if you want them to be the same.
Where to Start the Next Section
In a book, you often want to start the next section on the next right-side page (odd page). You would do this in Word by placing a Section Break: Odd Page before the chapter or section you want to start on the next odd numbered page, which will be a ride-side page. Word will then place a blank left-side page (if needed) before that next chapter to make certain that happens. Take note! Word will not display a blank left-side page in Normal view mode. This often confuses writers who don’t realize that that blank is there as they can’t see it. When you do a print preview, print, or create a PDF, Word will show the blank page. It is also reflected in the page numbering. You will notice that t seems that there is a missing page number. You might see a page 5, 6, 7, and then it goes to a new chapter which is shown as page 9. Where is page 8? It is a blank left-side page that Word is not showing you.
How to Insert a Section Break
Here is how you place a section break.
- Place your cursor where you want the section break to be placed. For example, after the last sentence of a chapter, before the next chapter starts.
- In the Word ribbon go to the Layout tab
- Click on Breaks
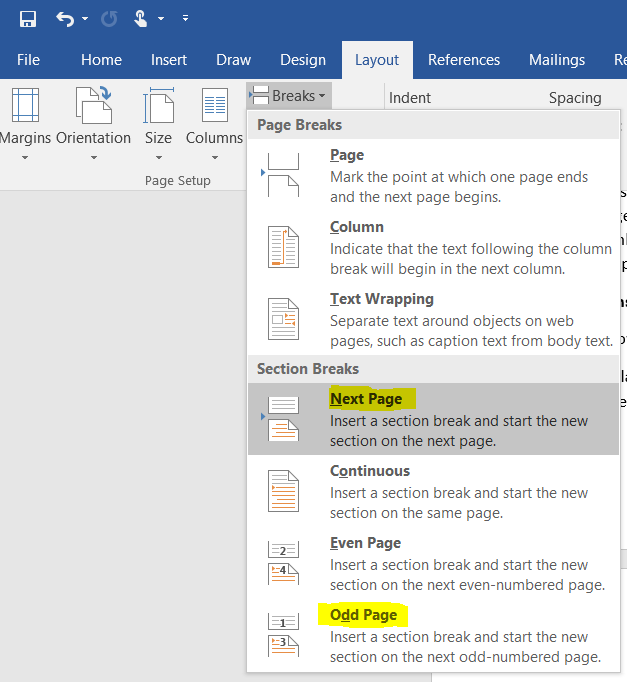
- From the drop down select either Next Page or Odd Page under Section Breaks.
You will then see a Section Break marker appear in your document (if you have show formatting marks turned on)

Start Chapter One on Page #1
Once your book is divided into sections, you can control the page numbering with in. For example, let’s say you want Chapter One to start on page #1. Make sure your chapters are divided into sections then place your cursor in Chapter One.
- First, add page numbers to your section.
- Place your cursor where you want the page numbers to appear in the section (such as the footer area)
- From the Word ribbon go to the Insert
- Click on the drop down for Page Number.
- Choose Current Position then Plain Number.
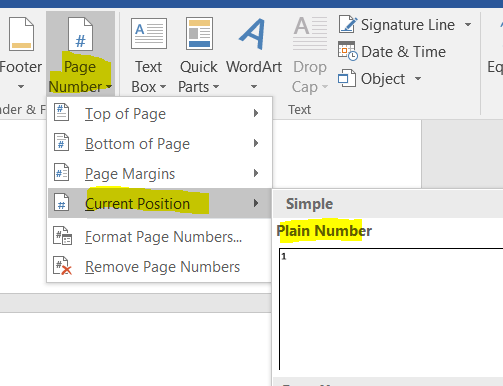
- Once your page number is where you want it, go back to that menu and select Format Page Numbers.
- Choose the Number format, then Start at: 1. Click OK.
A Different Running Head for Each Chapter
- Let’s say you want to place the current chapter title on the odd page running heads in your book. Here is how you would do that with the help of section breaks.
- First, make certain you have your document divided up by section breaks.
- Select all (press Ctrl + A)
- Go into Layout from the Word menu.
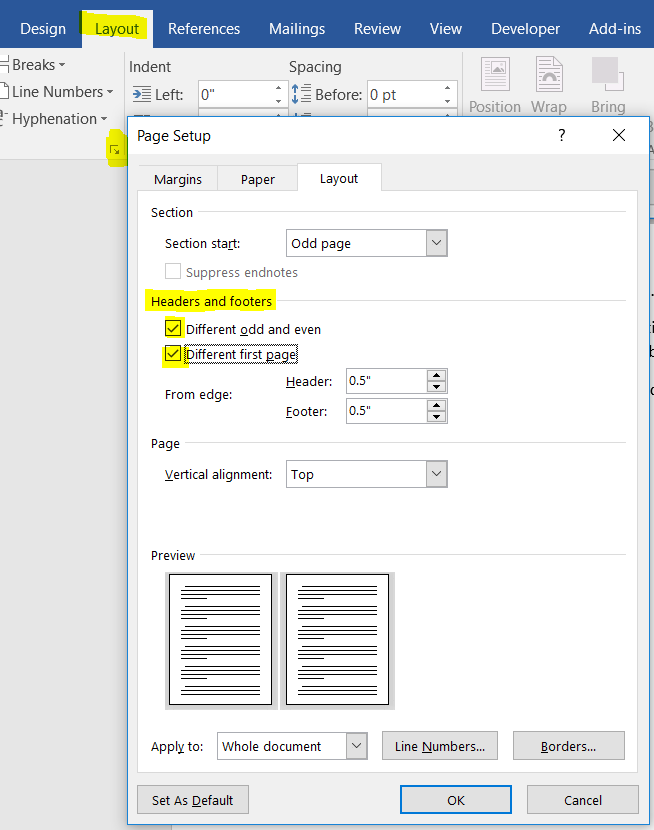
- Open the Page Setup
- Under the Layout tab under Headers and footers check both Different odd and even and Different first page. Click OK.
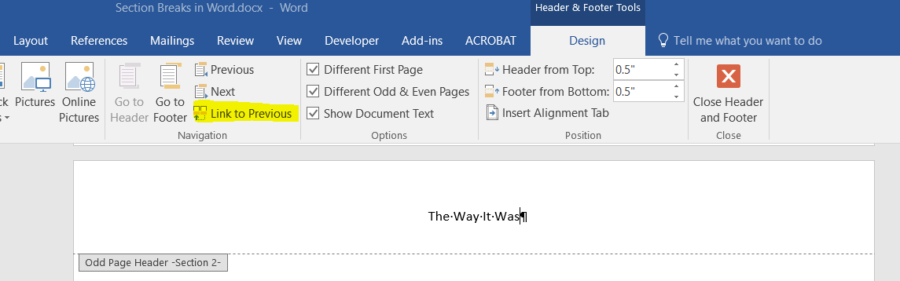
- Next, go into the header area of your document for Chapter One. You can get there by double clicking in that ear of your Word document.
- Before you do anything else, make sure the Link to Previous toggle is NOT on. If it is on, it will link this running head with the running head in the previous section and they would both be the same. Click it if needed to turn it off.
- Type your chapter title for this section in the header area. Click the Close Header
- Repeat that process for each chapter in your book.
By the way, if you are hiring someone to do your book layout, don’t worry about having to do any of these things with section breaks. Your formatter will handle all of that for you and is likely using Adobe InDesign, not Microsoft Word to format your book.
Questions? Post them in the comment section below.

by Kimberly Martin | Aug 15, 2017 | Author Toolbox Blog Hop, Book Design, Word Tips for Writers |
If you are writing a nonfiction book, you may have a section in the back referencing source material, such as other books or magazine articles. These references should be formatted with hanging indents. That is, the first line is flush left, and the following lines are indented as shown below. (more…)

by Kimberly Martin | Jul 18, 2017 | Author Toolbox Blog Hop, Writing Tips |
Your first draft of your manuscript is not your last draft. Neither is your second, third, or even your fourth draft! It will go through multiple rounds or edits, even before you hand it over to a professional editor (which I strongly suggest doing). Below are a few self-editing tips to help you get through the often-dreaded self-editing process.
- Utilize Microsoft Word’s grammar and spelling tools first. This will eliminate a lot of errors that you may not realize are errors. Word also gives grammar tips which can be helpful. Keep in mind, it is a computer and isn’t perfect. Some errors that come up, you may just need to ignore. You can also check readability statistics for your document including the grade level. (Look to the internet on how to use these tools.)
- Check out Grammarly.com. This program can help you track down, even more, issues than Microsoft Word can find. You should not replace a professional editor with Grammarly (a human is always better than computer algorithm), but it will help you find problems that you have missed.
- Certain words we use in writing are not necessary. Create a list of unnecessary words, such as that, just, then, really, very, etc. (Look to the internet for a detailed list.) Search your document to see if you can get rid of any unnecessary words.
- Often, dialogue tags, such as said are not always necessary. Turn these tags into actions.
- Look for, and remove redundancies. He clapped his hands. She blinked her eyes. It was large in size.
- After you have thoroughly reviewed your document, change the page size, margins, font size, and line spacing and review again. A simple change to how it looks can make errors pop out at you.
- Read your manuscript out loud. You might want to think about recording and listening to it as if it was an audiobook.
- Open your manuscript, go to the last page, and read your book backward, one sentence at a time. This will force you to read each sentence individually.
- Print out your book and have it bound at a copy shop such as Office Depot or FedEx office. Seeing a book in printed form often results in even more mistakes being found.
Looking for more in-depth self-editing tips and tricks? I suggest you pick up a copy of Self-Editing for Fiction Writers: How to Edit Yourself into Print by Renni Browne and Dave King.