What is a Section Break?
In Microsoft Word, section breaks are meant to divide your book into sections. In books, they are used between chapters and to divide the front-matter or back-matter pages. Section break should be placed after the title page, copyright page, dedication page, table of contents, chapter 1, chapter 2, and so on. These section breaks will create a page break between each of those sections.
But it is not just a page break. Section breaks also control the page numbers within the section, running heads, and whether the next section begins on the next page or next right hand (odd numbered) page. Let’s look at each of those.
Page Numbering
Section breaks allow you to control the numbering in each section. This lets you have page #1 be the first page of Chapter One. It also makes it possible to use lower case roman numerals for page numbers (i, ii, iii, iv, etc.) on the front-matter, and Arabic numerals (1, 2, 3, 4, etc.) on the chapter pages.
Running Heads
Each section has a first page, even page, and odd page header. You can place different running head text in each one (or not have any). In a book, the first-page header should be left blank as this would be the chapter title page, the even page header often has the book title, and the odd page header the current chapter title or author name. when you use section breaks, you can have different running heads in each section. This is useful for having the current chapter title for the running head of a section. You can also choose to link the current sections running head with the previous section if you want them to be the same.
Where to Start the Next Section
In a book, you often want to start the next section on the next right-side page (odd page). You would do this in Word by placing a Section Break: Odd Page before the chapter or section you want to start on the next odd numbered page, which will be a ride-side page. Word will then place a blank left-side page (if needed) before that next chapter to make certain that happens. Take note! Word will not display a blank left-side page in Normal view mode. This often confuses writers who don’t realize that that blank is there as they can’t see it. When you do a print preview, print, or create a PDF, Word will show the blank page. It is also reflected in the page numbering. You will notice that t seems that there is a missing page number. You might see a page 5, 6, 7, and then it goes to a new chapter which is shown as page 9. Where is page 8? It is a blank left-side page that Word is not showing you.
How to Insert a Section Break
Here is how you place a section break.
- Place your cursor where you want the section break to be placed. For example, after the last sentence of a chapter, before the next chapter starts.
- In the Word ribbon go to the Layout tab
- Click on Breaks
- From the drop down select either Next Page or Odd Page under Section Breaks.
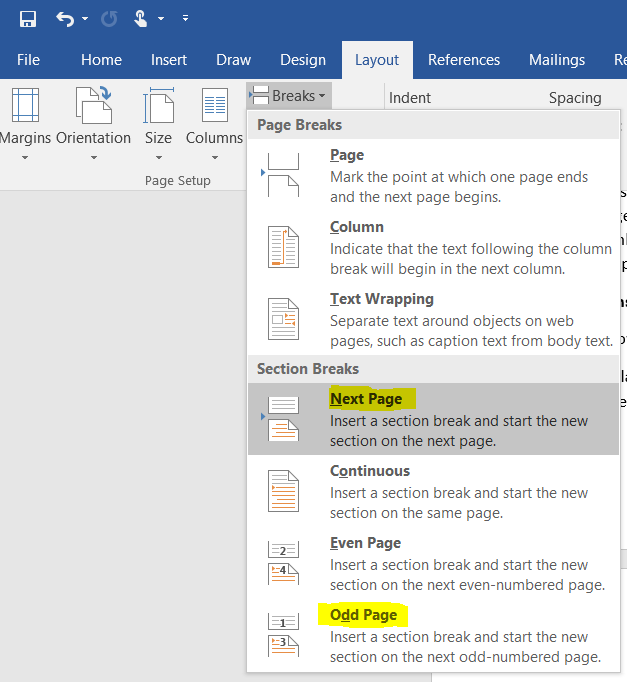
You will then see a Section Break marker appear in your document (if you have show formatting marks turned on)

Start Chapter One on Page #1
Once your book is divided into sections, you can control the page numbering with in. For example, let’s say you want Chapter One to start on page #1. Make sure your chapters are divided into sections then place your cursor in Chapter One.
- First, add page numbers to your section.
- Place your cursor where you want the page numbers to appear in the section (such as the footer area)
- From the Word ribbon go to the Insert
- Click on the drop down for Page Number.
- Choose Current Position then Plain Number.
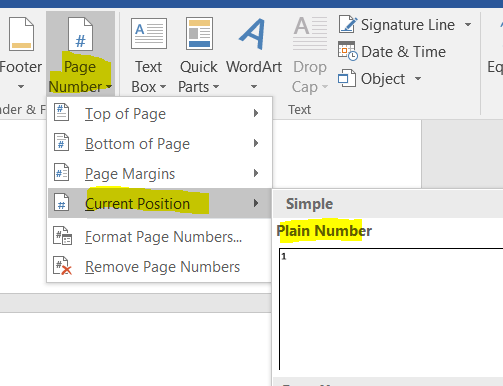
- Once your page number is where you want it, go back to that menu and select Format Page Numbers.
- Choose the Number format, then Start at: 1. Click OK.
A Different Running Head for Each Chapter
- Let’s say you want to place the current chapter title on the odd page running heads in your book. Here is how you would do that with the help of section breaks.
- First, make certain you have your document divided up by section breaks.
- Select all (press Ctrl + A)
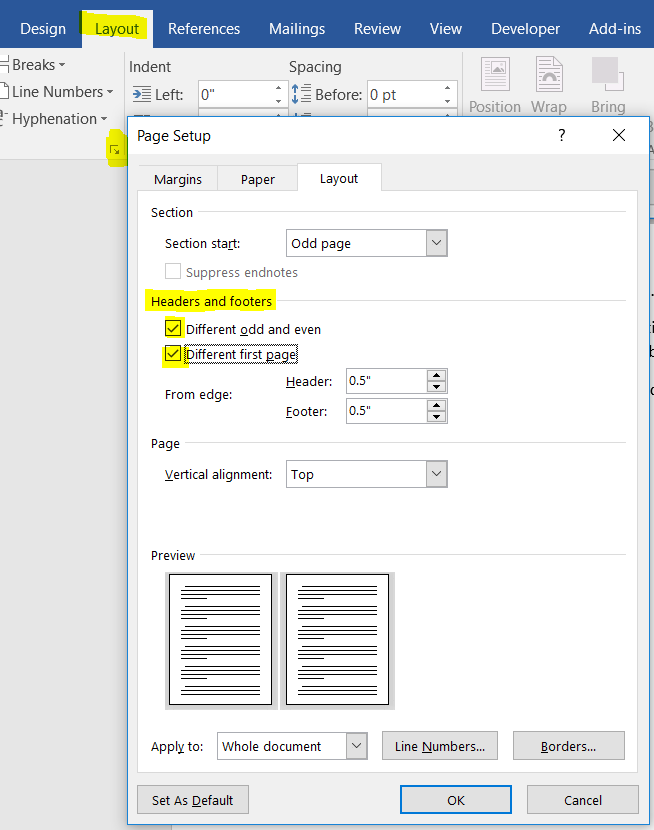
- Go into Layout from the Word menu.
- Open the Page Setup
- Under the Layout tab under Headers and footers check both Different odd and even and Different first page. Click OK.
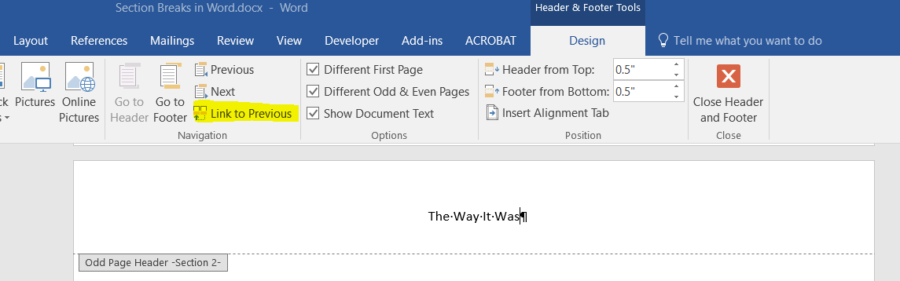
- Next, go into the header area of your document for Chapter One. You can get there by double clicking in that ear of your Word document.
- Before you do anything else, make sure the Link to Previous toggle is NOT on. If it is on, it will link this running head with the running head in the previous section and they would both be the same. Click it if needed to turn it off.
- Type your chapter title for this section in the header area. Click the Close Header
- Repeat that process for each chapter in your book.
By the way, if you are hiring someone to do your book layout, don’t worry about having to do any of these things with section breaks. Your formatter will handle all of that for you and is likely using Adobe InDesign, not Microsoft Word to format your book.
Questions? Post them in the comment section below.
How do I get page numbers to continue throughout each chapter and not break per section? Hence, getting pages 1 through whenever until the book ends.
Great tutorial. Thanks for all the screen shots. I know those take time to create, but they really help.
Thanks for these tips. If I ever decide to self-publish (and right now it’s looking more like when not if) I’m will reread all your posts. Thanks for another informative post.
Thank you for this. I’m not much of a formatter, but I’m wiser today. 🙂
Anna from elements of emaginette
Great overview of this. I had some problems last week trying to add section breaks in an A4 document. It kept removing them or moving them. I can’t remember how I finally got it to work. I think Word was just being glitchy.
Helpful comments. Word is a mystery to some writers and you’ve laid out a useful step-by-step tutorial.